How to Read Origami Diagrams: What Every Line and Arrow Means
Dashed lines, dash-dot lines, hollow arrows, double arrows, the little zigzag. Origami symbols are few and international, and once you recognize them, a Japanese diagram becomes a readable set of instructions.
An origami diagram is a closed language: few symbols, fixed rules, no deliberate ambiguity. Once you know how to read origami diagrams, you can fold a model from a Japanese book without understanding a word of the text, and that is exactly what the notation was created for.
The Lines
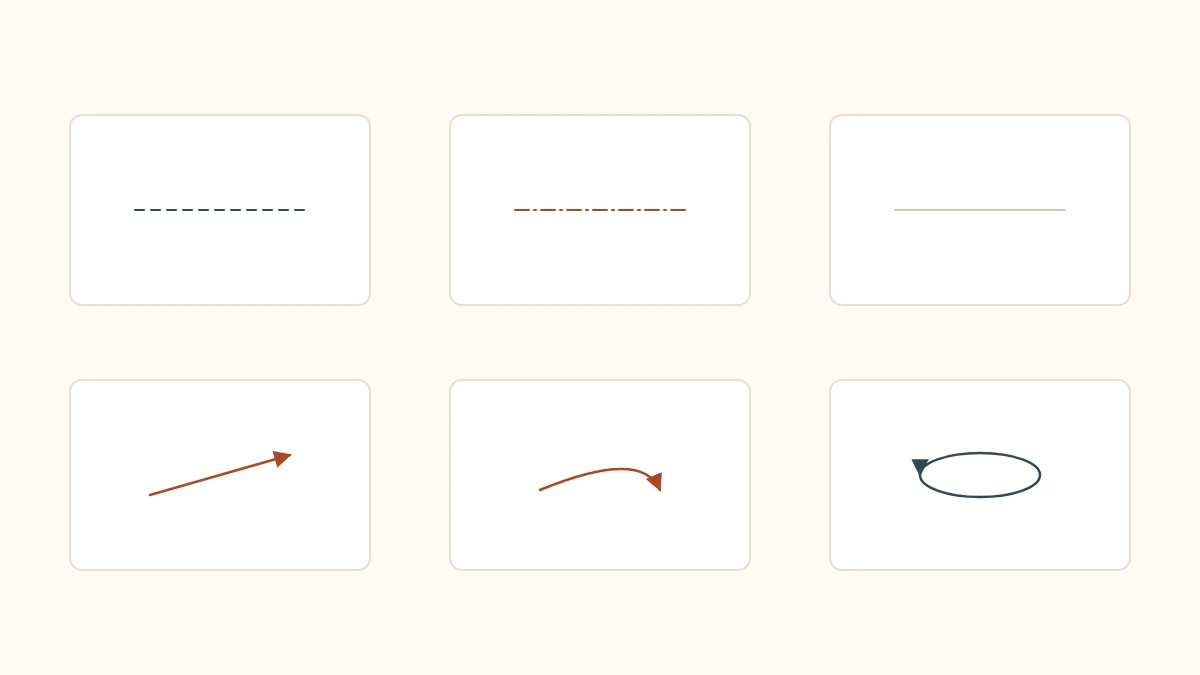
Everything starts with the type of line. There are three, and they tell you what to do with the paper.
| Line | Meaning | What you do |
|---|---|---|
| Dashed | Valley fold | Bring the edge toward you |
| Dash-dot | Mountain fold | Take the edge behind |
| Thin solid | Existing crease or edge of the paper | Nothing: it is a reference |
The third one causes the most confusion early on. A thin solid line in the middle of a figure is not an instruction: it shows where a crease was already made in earlier steps, or simply marks the edge of a layer underneath. If you try to fold on every solid line you see, the model won’t close.
What valley and mountain mean in practice, with the hand movement for each, is covered in basic origami folds.
The Arrows
If the lines tell you where to fold, the arrows tell you how.
- Plain arrow with a solid head. Fold in this direction. It is the most common instruction.
- Out-and-back arrow (with a double head or a return drawn in). Fold and unfold: you are only making a guide crease. Ignoring the “back” part is one of the most frequent mistakes, because the next step will assume the paper is open.
- Hollow or wide arrow. Turn the whole paper over. It often comes with a note about which side ends up facing up.
- Curved arrow closing a circle. Rotate the model flat on the table, without turning it over. It usually comes with the angle written out: 90°, 180°.
- Small zigzag arrow. Pleat: a valley and a mountain together.
- Thin arrow blowing inward. Inflate the model through the opening shown, as in the traditional balloon and the inflatable origami bunny.
There is also an arrow with a split head, used for “pull this layer out from inside,” and a magnifying glass, which only means the next drawing is enlarged. It is not a folding instruction.
The Numbers and What They Don’t Tell You
Steps are numbered, but each figure shows the state of the paper before the fold indicated on it. The result of that fold appears in the next figure.
That convention clears up most doubts. When a step looks impossible, look at the drawing after it: it shows where you are supposed to end up. Comparing the two images almost always explains the move better than rereading the key.
Tip
Diagrams rarely say which side of the paper should start facing up. That shows in the first figure, through the shading. The colored face is usually drawn in gray or with hatching; the white face is left white. Starting with the wrong side up reverses the colors of the entire model.
Where the Notation Comes From
The system in use today is known as the Yoshizawa–Randlett notation, and the story behind it is less linear than it is usually told.
A graphic distinction between folds toward the front and folds toward the back already existed in earlier Japanese publications; there are records of that kind of marking from the 1930s. Akira Yoshizawa’s decisive contribution, in the 1950s and 1960s, was something else: he introduced action arrows, which show the movement and not just the final position, and began representing each step in a single perspective drawing instead of pairs of figures.
Samuel Randlett and Robert Harbin adopted that vocabulary, added symbols for specific operations such as the petal fold and the rabbit ear, and published the set in English, which spread the notation beyond Japan. OrigamiUSA has a detailed article on this evolution, useful if you want the history in more precise terms.
That standardization is what makes origami a truly international practice: a diagram published in Tokyo works in Chicago with no translation. It is worth keeping in mind when you browse a collection like the diagrams shared by the British Origami Society.
Where Most People Get Lost
Three situations account for nearly all the sticking points:
The Step That “Disappears”
You make the fold, look at the next figure, and it doesn’t seem to match. Most of the time there was a “turn the paper over” between the two, indicated by a discreet hollow arrow in the corner. Look for it before deciding you made a mistake.
The Fold the Diagram Doesn’t Show
Older models sometimes skip stages considered obvious, especially openings and base collapses. If the diagram tells you to go from a plain square to a four-layer structure in a single step, it is probably asking for a preliminary base or waterbomb base without naming it.
The Reference Lines
Instructions like “fold the point to the line” require that line to exist. If it isn’t on your paper, you skipped a creasing step, the one with the out-and-back arrow.
Diagram or Video
Video shows the movement in real time and works well for the first few weeks. Diagrams teach you to read, and open up a much larger library: most of the models published over the twentieth century exist as diagrams, not as videos.
A transition that works: pick a model you already know how to fold from video and follow its diagram alongside. Since you already know the result of each stage, you have attention to spare for connecting symbol and movement. After two or three models like that, the diagram stops being an obstacle.
If you are just starting and haven’t picked a first model yet, follow the order suggested in the guide on how to start origami.
Reading a Short Sequence, Step by Step
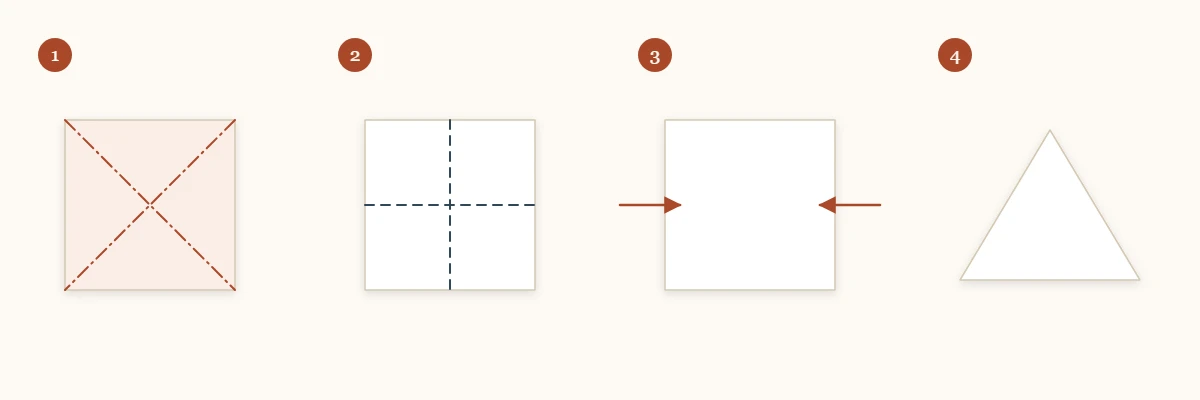
Imagine a diagram with four figures and no words. Here is how it translates:
- Figure 1: a gray square with two dashed diagonal lines and an out-and-back arrow on each. Reading: fold both diagonals and unfold. The gray tells you the colored side is up.
- Figure 2: the same square, now white, with dashed horizontal and vertical lines and a hollow arrow in the corner. Reading: the paper was turned over between figures 1 and 2 (which is why it went white), and now you crease it in half both ways.
- Figure 3: the square with curved arrows pointing from the sides toward the center. Reading: push the sides inward, collapsing the shape. A base is being formed.
- Figure 4: a triangle. Reading: this is the result of the collapse, and it confirms the base was the waterbomb base.
Notice that no instruction was written down. The meaning came from combining line type, arrow type, the color of the face and, above all, from comparing each figure with the one after it. That is how any diagram is read, and it is why you can fold from a book in Japanese.
Words That Appear in Japanese Diagrams
Even though the notation is visual, a few terms turn up often and are worth recognizing:
| Term | Meaning |
|---|---|
| Kami (紙) | Paper |
| Ori (折り) | Fold, to fold |
| Yama-ori (山折り) | Mountain fold |
| Tani-ori (谷折り) | Valley fold |
| Kiru (切る) | Cut. Rare, and a sign the model is not pure origami |
| Dan-ori (段折り) | Pleat, step fold |
The words yama (mountain) and tani (valley) explain where the English names come from: the translation is literal and the image is the same. The paper rises like a ridge or dips like a valley.
Frequently asked questions
Are Japanese origami diagrams different from American ones?
The symbols are practically the same, because nearly everyone uses the notation that took hold from the 1950s and 60s onward. The text may be in Japanese, but the lines, arrows, and numbered sequence work the same way, which is why you can fold a model from a book in a language you can't read.
What should you do when a step in the diagram doesn't make sense?
Look at the next drawing before attempting the current step. A diagram always shows the result of a fold in the figure that follows, and comparing the two images usually settles the question faster than rereading the key.