How to Make a Paper Boat: The Classic Step-by-Step Fold
The paper boat starts from an ordinary rectangular sheet and teaches the open-and-flatten move that reappears in dozens of models. Includes the tweaks that keep it floating longer.

Tutorial at a glance
Materials
- One rectangular sheet, printer paper or newspaper
- A smooth, firm surface
Few models have been handed down through as many generations as the paper boat. It starts from any rectangular sheet (newspaper, printer paper, a grocery flyer) and, along the way, teaches the open-and-flatten move that shows up again in dozens of other origami models.
One detail that tends to go unnoticed: the soldier’s hat and the boat are the same model at different stages. Stop at step 4 and you have a paper hat; keep going and you have a boat.
Before You Start
Use rectangular paper. The model depends on the difference between the sides of the sheet: it will close on a square, but it comes out stubby, with a bow that is too tall for the hull.
Newspaper works especially well because it is thin and large, which makes a good-sized boat. A sheet of US Letter (8.5 x 11 in) or A4 printer paper makes a boat roughly 5 inches (12 cm) long.
How to Make a Paper Boat, Step by Step
- Fold the sheet in half, bringing the two short edges together. Run a fingernail along the crease from the center out to the sides. Set the paper down with the fold at the top.
- Mark the center. Fold the paper in half side to side, press only lightly, and unfold. This crease is just a guide for the next step.
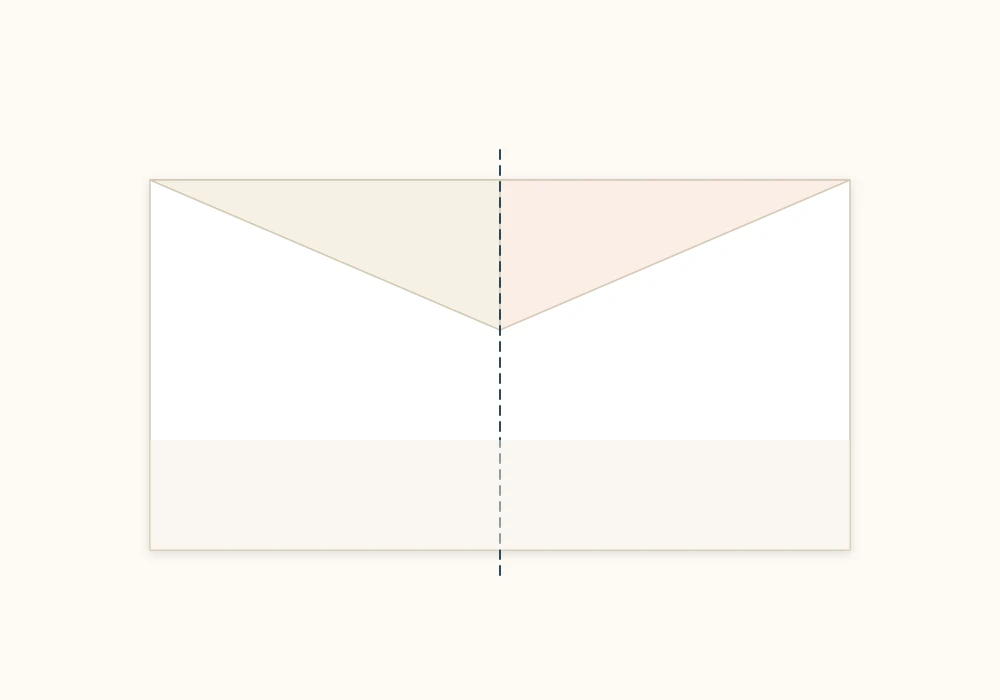
- Fold the two top corners down to the center line. They should meet in the middle without overlapping. A band of paper is left along the bottom, on both sides.
- Fold the bands up. The front band goes up over the triangle; flip the paper and repeat with the back one. You now have a triangular hat.
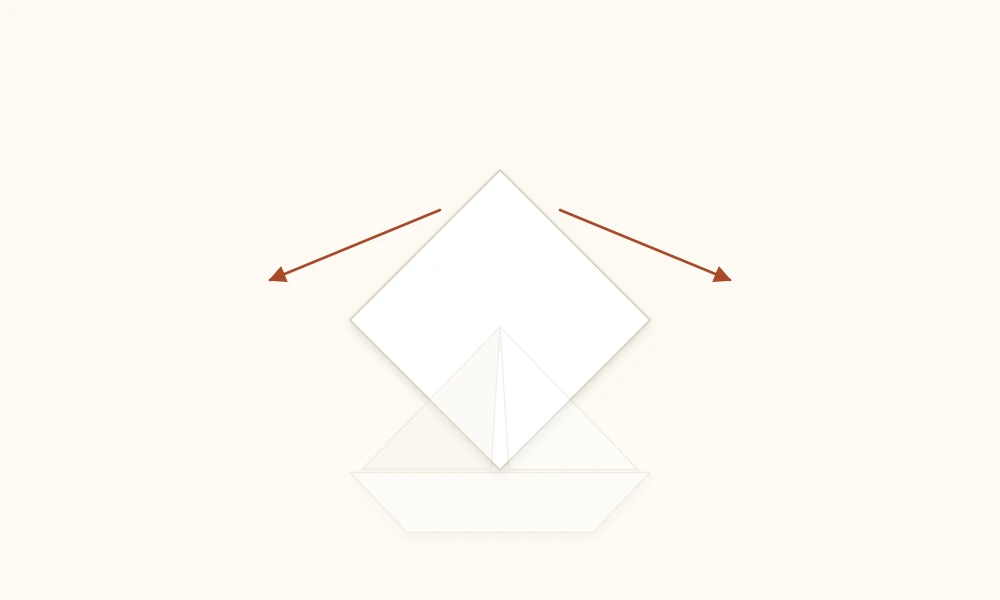
- Open the hat from the base and flatten it. Slide your thumbs into the bottom opening, pull your hands apart, and press the paper flat. The triangle turns into a diamond. This is the move that confuses people the first time. The trick is to bring the two opposite points together before you flatten.
- Fold the bottom points up. The front bottom point goes up to the top point; flip and repeat on the back. You have a triangle again, now smaller.
- Open and flatten once more, exactly as in step 5. You are back to a diamond.
- Pull the two top points out to the sides. Hold one in each hand and ease them apart. The boat opens on its own; shape the hull by pressing the bottom against the table.

Where the Fold Usually Goes Wrong
In Step 5, the Diamond Comes Out Crooked
The temptation is to flatten before aligning. Before you press, check that the two opposite points of the triangle sit exactly on top of each other. If one runs ahead of the other, the whole boat comes out lopsided, and there is no fixing it afterward.
In Step 8, the Bow Tears
This happens when you pull on one side only, or pull too fast. Move both points apart at the same time and slowly, giving the paper time to settle its layers.
Tip
If the boat won’t stand up, open the hull with your fingers from underneath and press the keel against the table, flattening the bottom slightly. A flat-bottomed boat is stable; a V-shaped bottom tips over.
Making the Boat Last on the Water
A paper boat floats, but not forever. The paper soaks up water from the waterline, goes soft, and the hull opens up. With ordinary printer paper that usually takes only a few minutes.
Three ways to stretch that time:
- Magazine paper. Its tighter surface takes longer to soak through than copy paper.
- Candle wax. Rub a white candle over the outside of the hull, covering the part that sits underwater well. It is the traditional method and the most effective one.
- A light load. An empty boat rocks and capsizes; a small coin in the center of the hull works as ballast.
Variations Worth Trying
Boat With a Sail
In step 6, instead of folding both points up, fold only the front one. The point left at the back stands upright and works as a sail once the model is opened.
Catamaran
Two small boats joined side by side with a strip of paper make a double hull that is far more stable on the water. It is a handy way to show kids how floating works, in the spirit of the ideas in origami with kids.
Why This Model Is a Good Place to Start
The boat uses two moves that carry over to a lot of what comes next: folding points to a center line, and opening and flattening. After it, the origami paper cup trains precise alignment, and the traditional origami bases get much easier to understand. The opening in step 5 is essentially the same gesture that collapses a preliminary base.
Why the Boat Capsizes
A paper boat tips over for two reasons, and both have a fix.
High center of gravity. The sides of the hull are tall and light, and the wind pushes on them. Opening the bottom wide, flattening the keel against the table before the boat goes in the water, lowers the center of gravity and solves most cases.
No ballast. An empty boat rides too high and any ripple flips it. A small coin resting in the center of the hull acts as a makeshift keel: the boat sits slightly lower in the water and becomes noticeably more stable.
A Paper Boat Race
You can turn the model into a game with what is already in the house:
- Fill a shallow tub or the sink with water.
- Each player folds their own boat, using different colors of paper.
- Mark a finish line with a piece of tape on the rim.
- Boats are powered by breath. Straws are allowed, hands are not.
The fun is in a discovery that turns up by itself: boats with a wider, more open bottom move more slowly but almost never flip. It is a conversation about stability that happens without anyone having to explain anything.
The Boat in Large Paper
A full double-page newspaper spread makes a boat around 12 inches (30 cm) long. At that size it stops being a toy and becomes a decoration: it suits a nautical-themed party, set on a shelf or hung up. The process is identical; only the scale changes.
Two practical differences at the larger scale: newspaper is thin and the hull sags, so it helps to fold two sheets stacked together; and step 8, opening the bow, needs to be done very slowly, because the larger area puts more stress on the points.
Frequently asked questions
Does a paper boat really float?
It floats for a few minutes. Printer paper soaks up water and softens from the waterline until the hull opens. Magazine paper, with its tighter surface, lasts a little longer, and a coat of candle wax rubbed on the outside extends that time considerably.
Can you make the boat from square paper?
The model is designed for a rectangle. It will close on a square, but it comes out short with a bow that is too tall, because the proportions of the hull depend on the difference between the sides of the sheet.