Origami Whale: Four Folds From a Kite Base
After the kite base, only three moves remain: fold it in half, raise the tail, and shape the fluke. Change the tail angle and the same model becomes a fish.

Tutorial at a glance
Materials
- Square blue or gray paper
The origami whale is probably the best second model for anyone who has just learned the kite base. After the base, only three moves remain — and one of them is many folders’ first reverse fold, done here at a large scale and through few layers, which makes mistakes cheap.
Step by Step
- Set the square as a diamond, colored side down. Fold it in half vertically, point to point, and unfold. The center crease is the reference for everything that follows.
- Make the kite base. Fold the two upper edges to the center crease, like closing a pair of gates. The paper takes the shape of a kite, with a long point at the bottom.
- Fold it in half, backward. Take the right half behind the left along the center crease. You now have a long, narrow shape, something like a spearhead, wide at one end and tapering to a fine point at the other.
- Position the whale with the wide end on the left — the head — and the fine point on the right, which will become the tail.
- Prepare the reverse fold. Fold the fine point upward at the angle you want for the tail, crease firmly, and unfold. Repeat in the opposite direction and unfold again. The paper needs to be creased both ways.
- Make the reverse fold. Open the two layers of the point slightly and push it upward between them, letting the tail rise on the inside. Close and press flat.
- Shape the tail fluke. Fold the very tip of the tail down diagonally on one side; flip and repeat on the other at the same angle. The tail takes on its typical flattened shape.
- Finish. Tuck a sliver of the head’s tip inward to round off the snout, and draw the eye.

Watch out
Skipping step 5 is the most common reason this model tears. Without a crease prepared in both directions, the top layer has nowhere to give when you push the point through, and it rips at the base of the tail.
The Same Fold Becomes a Fish
Change the angle in step 5 and the model changes species:
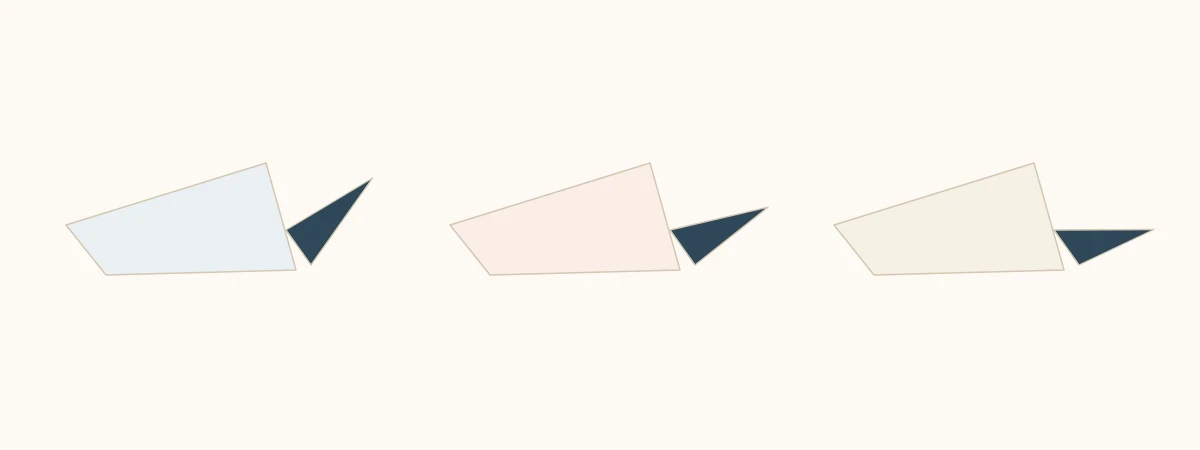
- Tail raised at a steep angle, almost vertical: a diving whale.
- Tail raised at a wider angle, close to 45°: an ordinary fish.
- Tail nearly horizontal, with the tip folded into a V: a dolphin.
It is worth folding all three side by side in different colors. The exercise shows, very visibly, how a single angle redefines the whole model.
Giving the Body Volume
Folded as described, the whale is flat and lies on its side. To make it stand on a table, there is a simple adjustment: open the two halves slightly at the belly, as if leafing through a book, and press the bottom against the table to create a flattened keel.
In paper between 80 and 100 gsm, the whale holds that volume on its own. In thin paper it closes back up — which is no problem if the piece is headed for an origami mobile, where it is seen in profile.
Why This Model Teaches So Well
Three things happen here, and all of them carry over to more complex models:
- The kite base appears on its own, not hidden inside another structure, which helps you recognize it later.
- The reverse fold is made through few layers, with a wide margin for error. In the crane (tsuru), the same fold happens in paper eight layers thick, with very little room.
- Angle as a design variable becomes obvious, because one change produces a different animal.
If the reverse fold still feels confusing, practice it in isolation first on strips of scrap paper — the movement is described step by step in basic origami folds.
A Simple Display
Three whales in different sizes, folded from 6-inch (15 cm), 4-inch (10 cm), and 3-inch (7.5 cm) squares in three shades of the same blue, make a set that works well on a shelf or in a frame with a light background. It is the kind of arrangement that delivers a lot for little folding time, much like a series of origami butterflies.
Where This Model Usually Goes Wrong
| Problem | Cause | Fix |
|---|---|---|
| The kite base comes out crooked | Center crease made off-axis | Check that the two points meet before creasing |
| The tail tears | Reverse fold made without a prepared crease | Crease as both a valley and a mountain before opening the layers |
| The tail is lopsided | Front and back layers at different angles | Fold both together, as a single piece |
| The whale won’t stand | Belly closed too tightly | Open the halves and flatten the keel |
Two Finishing Details
The spout. A thin strip of white paper, a little over an inch (about 3 cm) long, folded in half and glued to the top of the head, suggests the spray. It is the only place in this model where glue is worth using.
The smile. The lower edge of the head, where the two layers meet, already draws a curved line. Going over it with a pen turns the outline into a mouth, with nothing else to draw.
A Paper Ocean
In quantity, whales work better as a group than alone. One arrangement worth trying: six to eight pieces in three sizes and two shades of blue, set on a panel at staggered heights, like a pod seen from the side.
Folded from 3-inch (7.5 cm) paper with a hole through the back, they also suit ocean-themed mobiles — light enough to turn in a faint draft and recognizable from any angle, which is the requirement for any hanging piece.